Showing 13 Result(s)
Popcorn chicken recipe, Homemade popcorn chicken, How to make popcorn chicken, Best popcorn chicken, What is popcorn chicken?, Can I bake popcorn chicken instead of frying it?, How long can I store leftover popcorn chicken?, Is there a gluten-free version of this recipe?,
All Recipes ASIAN BREAKFAST CHICKEN CHRISTMAS DESSERT DINNER EASTER GAMEDAY Healthy Recipes LUNCH SIDE DISHES THANKSGIVING

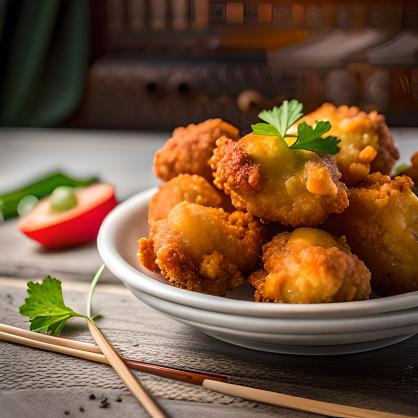
Popcorn Chicken Recipe- very crispy


Popcorn chicken recipe, Homemade popcorn chicken, How to make popcorn chicken, Best popcorn chicken, What is popcorn chicken?, Can I bake popcorn chicken instead of frying it?, How long can I store leftover popcorn chicken?, Is there a gluten-free version of this recipe?

Craving something crispy and bite-sized? Look no further than our simple and delicious Crispy Popcorn Chicken recipe. Whether you desire a savory snack, a delightful appetizer, or a crowd-pleasing addition to your gathering, this homemade popcorn chicken offers a burst of flavor and satisfying crunch.

Popcorn chicken, with its golden exterior and tender interior, is cherished by people of all ages. In this recipe, we’ll guide you to achieve popcorn chicken perfection. Marinated in buttermilk and coated with a flavorful blend of spices, these bite-sized chicken pieces boast a crispy, golden-brown exterior that reveals juicy, tender meat within.

Whether you’re planning a cozy movie night, hosting friends and family, or simply yearning for a tasty treat, this homemade popcorn chicken recipe is destined to become a household favorite. So, roll up your sleeves, preheat that oil, and prepare to savor the joy of making your very own Crispy Popcorn Chicken. Enjoy!

Can I make popcorn chicken with bone-in chicken?, Can I use chicken tenders instead of boneless chicken?, How to prevent the coating from falling off during frying?, Can I use an air fryer for making popcorn chicken?

Ingredients for Popcorn Chicken:

– 1 pound boneless, skinless chicken breasts or thighs, cut into bite-sized pieces
– 1 cup buttermilk
– 1 1/2 cups all-purpose flour
– 1 teaspoon paprika
– 1/2 teaspoon garlic powder
– 1/2 teaspoon onion powder
– 1/2 teaspoon dried thyme
– 1/2 teaspoon dried oregano
– 1/2 teaspoon salt
– 1/4 teaspoon black pepper
– Vegetable oil, for frying

Instructions for Crispy Popcorn Chicken:

1. Marinate the Chicken:
– Place the chicken pieces in a bowl and pour the buttermilk over them, ensuring each piece is coated.
– Cover the bowl and refrigerate for at least 30 minutes or overnight for maximum flavor.

2. Prepare the Coating:
– In a separate bowl, combine all-purpose flour, paprika, garlic powder, onion powder, dried thyme, dried oregano, salt, and black pepper. Mix well.

3. Coat the Chicken:
– Remove the marinated chicken from the refrigerator.
– Heat vegetable oil in a deep fryer or heavy-bottomed pot to 350°F (175°C).
– Take each chicken piece, allowing excess buttermilk to drip off, and coat it thoroughly in the seasoned flour mixture. Press the flour onto the chicken to ensure it sticks.

4. Fry the Popcorn Chicken:
– Carefully place coated chicken pieces into the hot oil one at a time, avoiding overcrowding the pot.
– Fry in batches for about 4-5 minutes or until the chicken is golden brown and cooked through.
– Use a slotted spoon to remove the chicken from the oil and place it on a paper towel-lined plate to drain excess oil.

5. Serve and Enjoy:
– Once all popcorn chicken is fried, serve it hot with your favorite dipping sauces, such as ketchup, barbecue sauce, or ranch dressing.

Popcorn chicken recipe, Homemade popcorn chicken, How to make popcorn chicken, Best popcorn chicken, What is popcorn chicken?, Can I bake popcorn chicken instead of frying it?, How long can I store leftover popcorn chicken?, Is there a gluten-free version of this recipe?,

FAQs About Crispy Popcorn Chicken:

Q: Can I use chicken tenders instead of boneless breasts or thighs?
A: Yes, you can substitute chicken tenders for the boneless breasts or thighs. They are smaller and cook quickly.

Q: How can I make this recipe spicier?
A: To add heat, include cayenne pepper or chili powder in the flour mixture for a spicy kick.

Q: Can I bake the popcorn chicken instead of frying it?
A: Absolutely! Preheat your oven to 400°F (200°C), place the coated chicken on a baking sheet, and bake for about 15-20 minutes or until they are cooked through and golden brown.

Q: Can I make popcorn chicken in advance and reheat it?
A: While it’s best enjoyed fresh, you can reheat popcorn chicken in the oven at 350°F (175°C) for about 10-15 minutes to regain crispiness.

Q: What are some creative dipping sauce ideas?
A: Consider honey mustard, Sriracha mayo, or sweet and sour sauce for unique dipping flavors.

Can I make popcorn chicken with bone-in chicken?, Can I use chicken tenders instead of boneless chicken?, How to prevent the coating from falling off during frying?, Can I use an air fryer for making popcorn chicken?

Q: How long can I store leftover popcorn chicken?
A: Store any leftovers in an airtight container in the refrigerator for up to 3-4 days. Reheat in the oven for best results.

Q: Can I use bone-in chicken for this recipe?
A: While boneless chicken is typically used for popcorn chicken, you can use bone-in chicken pieces. Just be sure to adjust the cooking time to ensure the chicken is fully cooked.

Q: Is there a gluten-free alternative for the coating?
A: Yes, you can use gluten-free flour or a blend of rice flour and cornstarch for a gluten-free coating. Ensure your seasoning blend is also gluten-free.

Q: Can I use an air fryer to make popcorn chicken?
A: Absolutely! Preheat your air fryer to 400°F (200°C) and cook the coated chicken in a single layer for about 10-12 minutes, flipping halfway through for even cooking.

Q: What’s the best way to keep popcorn chicken warm for a party or gathering?
A: To keep popcorn chicken warm, place it on a baking sheet in a low-temperature oven (around 200°F/93°C) or use a warming tray or chafing dish.

How do I reheat leftover popcorn chicken?, Can I freeze homemade popcorn chicken?, What seasonings are used in popcorn chicken coating?, How long should I marinate the chicken in buttermilk?, What's the ideal frying temperature for popcorn chicken?

Q: Can I make a large batch of popcorn chicken and freeze it for later?
A: Yes, you can freeze popcorn chicken. After frying, let it cool completely, then freeze it in a single layer on a baking sheet before transferring to an airtight container or freezer bag. Reheat in the oven when ready to enjoy.

Q: How do I prevent the coating from falling off during frying?
A: Make sure the chicken is well-coated with buttermilk and that the seasoned flour mixture is pressed onto the chicken. This helps the coating adhere properly.

Q: Can I use a different type of oil for frying?
A: Yes, you can use vegetable, canola, peanut, or sunflower oil for frying, depending on your preference and any potential allergies.

Q: Are there alternatives to buttermilk for marinating the chicken?
A: If you don’t have buttermilk, you can use plain yogurt or a mixture of milk and vinegar (1 cup of milk + 1 tablespoon of vinegar) as a substitute.

Q: Can I make a healthier version of popcorn chicken?

A: To make a healthier version, consider baking the coated chicken pieces or using an air fryer. You can also use whole wheat flour or almond flour for a nuttier flavor and added nutrition.

Q: What can I serve as side dishes with popcorn chicken?
A: Popular sides include coleslaw, french fries, potato salad, or a crisp green salad. Get creative with your choices!

Q: Can I make this recipe with boneless chicken wings instead of traditional popcorn chicken pieces?
A: Absolutely! You can adapt the recipe to create boneless chicken wings by adjusting the size of the chicken pieces and cooking time to your liking.

How do I reheat leftover popcorn chicken?, Can I freeze homemade popcorn chicken?, What seasonings are used in popcorn chicken coating?, How long should I marinate the chicken in buttermilk?, What's the ideal frying temperature for popcorn chicken?

Cake Recipes

How to Choose and Use the Perfect Cooking Oils : A Guide to Choosing the Right Oil for every dish


When it comes to cooking, the type of oil you choose can make a world of difference in flavor, texture, and overall culinary experience. With the wide array of cooking oils available, it’s essential to understand their unique properties and how to use them effectively. In this beginner’s guide, we’ll explore a variety of cooking oils and unlock their potential to elevate your dishes to new heights. Get ready to embark on an exciting journey through the diverse world of cooking oils!

Extra Virgin Olive Oil: Liquid Gold in Your Kitchen
Extra virgin olive oil is a versatile oil that adds a distinct fruity flavor to dishes. It’s perfect for salad dressings, drizzling over roasted vegetables, and enhancing the flavors of pasta and grain-based dishes. Its low smoke point makes it unsuitable for high-heat cooking but ideal for bringing a touch of Mediterranean goodness to your meals.

Coconut Oil: A Tropical Twist to Your Cooking
Coconut oil is renowned for its unique flavor and aroma. It’s excellent for baking, adding a delightful tropical twist to cookies, cakes, and muffins. With its high smoke point, it’s also suitable for sautéing, stir-frying, and even as a dairy-free replacement for butter in vegan recipes.

Avocado Oil: The Creamy Companion in Your Kitchen
Avocado oil is a healthy choice that’s rich in monounsaturated fats. With its mild flavor and high smoke point, it’s perfect for various cooking methods. Use it for sautéing vegetables, grilling meat and fish, and as a dressing base for salads. Its smooth and buttery texture makes it a fantastic substitute for mayo or butter in recipes.

Sesame Oil: Unlock the Secrets of Asian Cuisine
Sesame oil adds an unmistakable nutty flavor to dishes and is widely used in Asian cuisine. Toasted sesame oil brings a rich aroma and is fantastic for stir-fries, marinades, and drizzling over Asian noodles. Untoasted sesame oil has a milder taste and is suitable for light sautéing and salad dressings.

Grapeseed Oil: Light and Neutral, a Kitchen Chameleon
Grapeseed oil is a versatile oil with a mild, neutral flavor. It has a high smoke point, making it ideal for frying, roasting, and baking. Use it for everything from crispy pan-fried fish to oven-roasted vegetables. Its light taste allows the flavors of your ingredients to shine.

Peanut Oil: Unleashing Bold Flavors
Peanut oil is prized for its high smoke point and bold nutty flavor. It’s perfect for deep-frying, stir-frying, and creating authentic Asian dishes. Use it to achieve crispy and flavorful results in your stir-fries, tempura, and even homemade peanut sauce.

Sunflower Oil: Versatile and Heart-Healthy
Sunflower oil is a light and versatile oil with a mild taste. It’s suitable for various cooking methods, including frying, sautéing, and baking. Its high smoke point makes it a great choice for high-heat cooking, such as deep-frying. Sunflower oil works well in a wide range of dishes, from roasted vegetables to homemade mayonnaise.

Canola Oil: A Multi-Purpose Cooking Oil
Canola oil is a widely used oil due to its neutral flavor and high smoke point. It’s a great all-purpose oil suitable for frying, baking, and sautéing. Use it in everything from crispy fried chicken to fluffy cakes and cookies.

Red Palm Oil: A Vibrant Addition to Your Cuisine
Red palm oil has a distinct deep red color and a rich, earthy flavor. It’s commonly used in African, Caribbean, and Southeast Asian cuisines. Red palm oil adds a unique taste and vibrant hue to stews, curries, and rice dishes. Its high smoke point also makes it suitable for frying and sautéing.

By understanding the properties and flavors of different cooking oils, you can elevate your dishes to new heights. From the fruity notes of extra virgin olive oil to the tropical essence of coconut oil, and the vibrant hue of red palm oil, each oil brings its own distinct characteristics to your cooking. Experiment with these oils, discover their unique qualities, and watch as your culinary creations come alive with flavors. So, get ready to dive into the wonderful world of cooking oils and unleash your culinary creativity!

Rotisserie Chicken, Homemade Rotisserie Chicken, Rotisserie Chicken Recipe, Perfect Rotisserie Chicken, How to Make Rotisserie Chicken, Rotisserie Chicken Seasoning, Rotisserie Chicken Grill,
AFRICAN All Recipes ASIAN CARIBBEAN CHICKEN CHRISTMAS DINNER EASTER GAMEDAY Healthy Recipes HOLIDAYS INDIAN LUNCH THANKSGIVING

How to Make Rotisserie Chicken at Home

Rotisserie Chicken, Homemade Rotisserie Chicken, Rotisserie Chicken Recipe, Perfect Rotisserie Chicken, How to Make Rotisserie Chicken, Rotisserie Chicken Seasoning, Rotisserie Chicken Grill,

How to Make Rotisserie Chicken at Home: Flavorful and Juicy

Rotisserie chicken is a beloved dish known for its succulent meat and crispy skin. While it’s easy to pick up a rotisserie chicken from the store, there’s something incredibly satisfying about making it at home. In this recipe, we’ll walk you through how to create the perfect rotisserie chicken that’s bursting with flavor and juiciness.

Ingredients for Homemade Rotisserie Chicken:

  • 1 whole chicken (approximately 4-5 pounds)
  • 2 tablespoons olive oil
  • 2 teaspoons salt
  • 1 teaspoon black pepper
  • 1 teaspoon paprika
  • 1 teaspoon garlic powder
  • 1 teaspoon onion powder
  • 1 teaspoon dried thyme
  • 1 teaspoon dried rosemary
  • 1 teaspoon dried oregano
  • 1 lemon, halved
  • 4 cloves garlic, peeled and smashed
  • 1 small onion, quartered

Equipment Needed:

  • Rotisserie attachment for your grill or a countertop rotisserie oven
  • Butcher’s twine (for trussing the chicken)
  • Rotisserie Chicken Oven, Cooking Rotisserie Chicken, Trussing Chicken, Seasoning Blend for Chicken, Rotisserie Chicken Tips, Rotisserie Chicken FAQs, Rotisserie Chicken Cooking Time, Leftover Rotisserie Chicken

Instructions for Making the Perfect Rotisserie Chicken:

1. Prepare the Chicken:

  • Start by removing any giblets or neck from the chicken cavity and patting it dry with paper towels.
  • Truss the chicken using butcher’s twine to secure the wings and legs close to the body. This ensures even cooking.

2. Season the Chicken:

  • In a small bowl, combine the salt, black pepper, paprika, garlic powder, onion powder, dried thyme, dried rosemary, and dried oregano.
  • Rub the olive oil all over the chicken, ensuring it’s evenly coated.
  • Sprinkle the spice mixture over the entire surface of the chicken, including the cavity.

3. Add Flavorful Elements:

  1. Place the halved lemon, smashed garlic cloves, and quartered onion into the chicken cavity. These aromatic elements will infuse the chicken with wonderful flavors as it cooks.

4. Preheat the Grill or Rotisserie Oven:

  1. If you’re using a grill, set it up for indirect grilling. Preheat one side to medium-high heat (around 350°F/175°C) and leave the other side off. If you’re using a countertop rotisserie oven, preheat it according to the manufacturer’s instructions.

5. Thread the Chicken onto the Rotisserie Spit:

  1. Slide the spit through the center of the chicken, ensuring it’s secure and balanced.

6. Start Rotisserie Cooking:

  1. If using a grill, place the spit with the chicken over the unlit side. If using a rotisserie oven, follow the manufacturer’s guidelines.
  2. Turn on the rotisserie motor and let it begin to rotate the chicken.

7. Monitor and Adjust:

  1. Close the grill lid or the rotisserie oven door.
  2. Cook the chicken for about 1.5 to 2 hours, or until the internal temperature of the thickest part of the thigh reaches 165°F (75°C). This slow cooking method ensures a crispy, golden-brown skin and juicy meat.

8. Rest and Carve:

  1. Once the chicken is cooked to perfection, turn off the heat and carefully remove the spit.
  2. Let the chicken rest for about 10 minutes before carving. This allows the juices to redistribute, keeping the meat moist.

9. Carve and Serve:

  1. Carve the rotisserie chicken into desired portions, and serve it with your favorite sides, such as roasted vegetables, mashed potatoes, or a fresh salad.

Tips for the Best Rotisserie Chicken:

    • Brine for Extra Flavor: Consider brining the chicken for a few hours before cooking for even more flavor and juiciness.
    • Experiment with Seasonings: Feel free to customize the seasoning blend to your taste. Add herbs like thyme, rosemary, or sage for a unique twist.

Frequently Asked Questions (FAQs) About Homemade Rotisserie Chicken:

Q: Can I use a different type of poultry, like turkey, for rotisserie cooking?
A: Yes, you can absolutely use different types of poultry for rotisserie cooking. Turkey is a fantastic choice, especially for holiday feasts. Just adjust the cooking time according to the size of the bird.
Q: Do I need a rotisserie attachment for my grill, or can I use a rotisserie oven for this recipe?
A: You have options! You can use a rotisserie attachment for your grill or a countertop rotisserie oven. Both methods work well; just follow the specific instructions for your equipment.
Q: Can I marinate the chicken before rotisserie cooking it?
A: Certainly! Marinating the chicken before rotisserie cooking can add even more flavor. Choose a marinade that complements your seasoning blend and allow the chicken to marinate in the refrigerator for a few hours or overnight for maximum flavor.
Q: Is it necessary to truss the chicken before rotisserie cooking?
A: Trussing helps the chicken cook evenly and maintain its shape, resulting in a more visually appealing presentation. While it’s not absolutely necessary, it’s recommended for the best results.
Q: What’s the best way to store leftover rotisserie chicken?
A: Store leftover rotisserie chicken in an airtight container in the refrigerator for up to 3-4 days. You can also freeze it for longer storage. Use leftover chicken in sandwiches, salads, soups, or casseroles.
Q: Can I use a different wood for smoking on the grill?
A: Absolutely! Experiment with various wood chips or chunks for smoking to impart different flavors. Popular options include hickory, applewood, cherry, and mesquite. Just be sure to soak the wood chips before using them on the grill.
Q: Can I cook rotisserie chicken without a rotisserie attachment or rotisserie oven?
A: While a rotisserie attachment or oven provides the best results, you can still achieve delicious rotisserie-style chicken on a grill by using indirect heat. Place a drip pan with water or broth beneath the chicken to keep it moist while it cooks.
Q: Can I make rotisserie chicken using a gas grill?
A: Yes, you can make rotisserie chicken using a gas grill with a rotisserie attachment. Follow the manufacturer’s instructions for setting up and using the rotisserie on your specific grill model.
Q: How can I add a smoky flavor to my rotisserie chicken on a gas grill?
A: To add a smoky flavor, use wood chips in a smoker box or aluminum foil pouch placed over a lit burner on the gas grill. This method will infuse your chicken with a delightful smokiness.
Q: Can I use fresh herbs in place of dried herbs in the seasoning blend?
A: Yes, you can use fresh herbs in the seasoning blend. Keep in mind that fresh herbs have a milder flavor than dried herbs, so you may need to use a larger quantity for the same level of flavor.
Q: Can I make rotisserie chicken with skinless chicken?
A: While skin-on chicken is more traditional for rotisserie cooking because it results in crispy skin, you can make rotisserie chicken with skinless chicken if you prefer a lighter option. Just be sure to baste it with oil or a marinade to prevent it from drying out.
Q: Can I cook rotisserie chicken in an oven if I don’t have a rotisserie attachment or oven?
A: If you don’t have a rotisserie attachment or oven, you can still achieve similar results by roasting the seasoned chicken in your oven at a moderate temperature (around 350°F/175°C) until it reaches an internal temperature of 165°F (75°C). Baste it occasionally for extra flavor and moisture.
Rotisserie Chicken, Homemade Rotisserie Chicken, Rotisserie Chicken Recipe, Perfect Rotisserie Chicken, How to Make Rotisserie Chicken, Rotisserie Chicken Seasoning, Rotisserie Chicken Grill,


chicken burger recipe homemade
All Recipes BREAKFAST CHICKEN CHRISTMAS DINNER EASTER GAMEDAY LUNCH SIDE DISHES Snacks THANKSGIVING

Chicken Burger Recipe


chicken burger recipe homemade

Homemade Chicken Burger Recipe

Ingredients for Chicken Burgers:

  • 1 pound Ground Chicken
  • 1/2 cup Breadcrumbs
  • 1/4 cup Onion, finely chopped
  • 2 cloves Garlic, minced
  • 2 tablespoons Fresh Herbs (parsley and chives), chopped
  • 1 Egg
  • Salt and Pepper to taste
  • Olive Oil for cooking
  • Burger Buns (your choice)
  • Lettuce, Tomato, and Onion for toppings
  • Optional: Cheese slices
  •  best chicken burger recipe, Homemade chicken burger, Spicy chicken burger, Crispy chicken burger, Grilled chicken burger, BBQ chicken burger, Ground chicken burger, Healthy chicken burger, Vegetarian chicken burger, Chicken burger patty, Chicken burger toppings, Chicken burger sauce, Classic chicken burger, Chicken avocado burger

Instructions for the Perfect Chicken Burgers:

  1. Prepare the Chicken Mixture:
    • In a large mixing bowl, combine the ground chicken, breadcrumbs, chopped onion, minced garlic, fresh herbs, egg, salt, and pepper. Mix everything together until well combined.
  2. Shape the Burger Patties:
    • Divide the chicken mixture into equal portions and shape them into burger patties. Make sure they’re not too thick to ensure even cooking.
  3. Cook the Chicken Burgers:
    • Heat a grill or skillet over medium-high heat and add a drizzle of olive oil.
    • Place the chicken patties on the hot grill or skillet. Cook for about 5-6 minutes on each side or until the burgers are cooked through and have a beautiful golden crust.
  4. Assemble the Chicken Burgers:
    • Toast your burger buns lightly on the grill or in a toaster.
    • Assemble your chicken burgers with lettuce, tomato slices, onion rings, and any cheese if you desire.
  5. Serve and Enjoy:
    • Serve your chicken burgers immediately while they’re hot and juicy. Add your favorite condiments and sides, like ketchup, mayo, or a special sauce.
    • Keto chicken burger, Buffalo chicken burger, Teriyaki chicken burger, Chicken burger with coleslaw, Chicken burger with bacon, Chicken burger with cheese, Chicken burger with aioli

Tips for the Best Chicken Burgers:

  • Don’t Overmix: Be gentle when mixing the chicken mixture. Overmixing can result in dense burgers.
  • Keep Them Moist: To ensure your chicken burgers stay juicy, avoid overcooking. Use a meat thermometer to check that the internal temperature reaches 165°F (75°C).
  • Customize Your Toppings: Get creative with your burger toppings. Avocado, bacon, or caramelized onions are excellent choices.
  • Add a Sauce: Elevate your chicken burger with a homemade sauce or a flavorful store-bought one.
  • Side Suggestions: Serve your chicken burgers with classic fries, sweet potato fries, or a refreshing salad for a balanced meal.

Frequently Asked Questions (FAQs):

    1. Q: Can I make these chicken burgers in a vegetarian or vegan version?

A: Yes, you can create a vegetarian or vegan chicken burger by using plant-based ground meat substitutes like tofu, seitan, or a blend of beans and vegetables. Look for specific recipes catering to your dietary preferences.

    1. Q: What’s the secret to making a crispy chicken burger?

A: To achieve a crispy texture, consider coating the chicken patties in breadcrumbs or panko crumbs before cooking. Pan-frying in a little extra oil can also enhance crispiness.

    1. Q: Can I freeze uncooked chicken burger patties for later use?

A: Yes, you can freeze uncooked chicken burger patties for future meals. Separate them with parchment paper or plastic wrap to prevent sticking, and store them in an airtight container or freezer bag. Remember to thaw them in the refrigerator before cooking.

    1. Q: How do I prevent the chicken burger patties from falling apart on the grill?

A: To keep the patties intact, make sure the mixture is well-bound with breadcrumbs and egg. Additionally, chilling the patties in the refrigerator for about 30 minutes before grilling can help them hold their shape.

    1. Q: What’s a good sauce to pair with chicken burgers?

A: Chicken burgers go well with a variety of sauces, such as barbecue sauce, ranch dressing, honey mustard, or tzatziki. Experiment with different flavors to find your favorite combination.

    1. Q: Can I make mini chicken sliders with this recipe?

A: Absolutely! You can shape smaller chicken burger patties to create delicious sliders for parties or gatherings. Just adjust the cooking time accordingly to ensure they’re thoroughly cooked.

    1. Q: Are chicken burgers a healthier option than beef burgers?

A: Chicken burgers tend to be lower in saturated fat than beef burgers, making them a potentially healthier choice. However, the overall healthiness of your burger depends on factors like the type of meat, cooking method, and toppings used.

    1. Q: Can I use pre-ground chicken from the store?

A: Yes, you can use pre-ground chicken from the store if you prefer a convenient option. However, choosing high-quality, lean ground chicken can contribute to better flavor and texture.

    1. Q: What’s the best way to thaw frozen ground chicken for this recipe?

A: The safest way to thaw frozen ground chicken is in the refrigerator. Place it in a bowl or on a plate to catch any drips and allow it to thaw slowly. This method ensures food safety.

    1. Q: Can I use different types of bread for the burger buns?

A: Yes, you can choose your favorite type of bread for the burger buns, whether it’s classic sesame seed buns, brioche, whole wheat, or even a gluten-free option to suit your dietary preferences.

    1. Q: Are there any low-carb alternatives for the breadcrumbs in the recipe?

A: If you’re following a low-carb or keto diet, you can use almond flour or crushed pork rinds as a substitute for breadcrumbs in the chicken mixture.

    1. Q: What are some creative ideas for chicken burger toppings?

A: You can get inventive with toppings, such as pineapple slices, fried egg, guacamole, sautéed mushrooms, or coleslaw, to add unique flavors and textures to your chicken burger.

    1. Q: Can I make a spicy version of these chicken burgers?

A: Absolutely! To add some heat, mix in ingredients like crushed red pepper flakes, diced jalapeños, or your favorite hot sauce into the chicken mixture before shaping the patties.

    1. Q: Is there a recommended cooking time for grilling chicken burgers?

A: Cooking times may vary depending on the thickness of your chicken patties and the heat of your grill. Use a meat thermometer to ensure the internal temperature reaches 165°F (75°C) for safe consumption.

    1. Q: Can I prepare the chicken mixture in advance and store it for later use?

A: Yes, you can prepare the chicken mixture, shape it into patties, and refrigerate them for a few hours or overnight before cooking. This can help save time when you’re ready to grill.

    1. Q: What’s a good way to add a smoky flavor to the chicken burgers?

A: You can infuse a smoky flavor by grilling the chicken burgers over charcoal or by using a smoker box on your gas grill. Alternatively, adding a touch of smoked paprika to the mixture can impart a smoky taste.

    1. Q: Can I use ground chicken with skin and bones for this recipe?

A: For the best texture and flavor, it’s recommended to use boneless, skinless ground chicken. Ground chicken with skin and bones may result in a different taste and texture.

    1. Q: Can I make gluten-free chicken burgers?

A: Yes, you can make gluten-free chicken burgers by using gluten-free breadcrumbs or crushed gluten-free crackers as a substitute for regular breadcrumbs in the recipe.

    1. Q: How can I add a tangy twist to my chicken burger toppings?

A: For a tangy kick, consider toppings like pickles, pickled onions, banana peppers, or a dollop of zesty coleslaw.

    1. Q: Are there alternative cooking methods besides grilling or skillet frying?

A: Yes, you can also bake chicken burgers in the oven. Preheat the oven to 375°F (190°C) and bake the patties on a baking sheet for approximately 20-25 minutes, flipping them halfway through.

    1. Q: Can I make keto-friendly chicken burgers with this recipe?

A: Absolutely! By omitting breadcrumbs and opting for keto-friendly burger buns or lettuce wraps, you can create delicious keto chicken burgers.

Now, it’s time to fire up the grill or heat up your skillet and savor the best chicken burgers you’ve ever tasted. Once you try this recipe, you’ll never look at chicken burgers the same way again. Enjoy!

Homemade chicken burger, Spicy chicken burger, Crispy chicken burger, Grilled chicken burger, BBQ chicken burger, Ground chicken burger, Healthy chicken burger, Vegetarian chicken burger, Chicken burger patty, Chicken burger toppings, Chicken burger sauce, Classic chicken burger, Chicken avocado burger, Keto chicken burger, Buffalo chicken burger, Teriyaki chicken burger, Chicken burger with coleslaw, Chicken burger with bacon, Chicken burger with cheese, Chicken burger with aioli, Chicken burger with avocado, Crispy chicken sandwich, Chicken burger calories, Chicken burger vs beef burger, Best chicken burger, History of chicken burgers,

Easy Cinnamon Rolls, Cinnamon Rolls Recipe, Homemade Cinnamon Rolls, Cinnamon Bun Recipe, Sweet Breakfast Ideas, Baking Cinnamon Rolls,
All Recipes BREAKFAST Cake Recipes CHRISTMAS COOKIES DESSERT EASTER GAMEDAY Snacks

Easy Cinnamon Rolls Recipe

Easy Cinnamon Rolls, Cinnamon Rolls Recipe, Homemade Cinnamon Rolls, Cinnamon Bun Recipe, Sweet Breakfast Ideas, Baking Cinnamon Rolls,
Freshly Baked Cinnamon Rolls

Hey there, fellow food lovers! Today, I’m absolutely thrilled to share with you one of my all-time favorite recipes: Easy Cinnamon Rolls. These pillowy soft, cinnamon-infused spirals of joy have the power to brighten even the gloomiest mornings. So, put on your apron, roll up your sleeves, and let’s dive into the world of cinnamon-scented delight!

The Sweet Aroma of Cinnamon Bliss

There’s something about the warm, comforting aroma of cinnamon wafting through the kitchen that instantly puts a smile on my face. It’s like a hug from the inside out. And that’s precisely what you’ll experience as you bake these fluffy wonders.

Ingredients for Cinnamon Rolls

Before we get started, let’s gather our  ingredients. We’ll need:

For the Dough:
– 2 ¼ teaspoons active dry yeast
– ½ cup warm milk
– ¼ cup granulated sugar
– 1 egg
– ¼ cup unsalted butter, melted
– 3 ½ cups all-purpose flour
– ½ teaspoon salt

For the Filling:
– ⅔ cup brown sugar, packed
– 2 tablespoons ground cinnamon
– ¼ cup unsalted butter, softened

For the Frosting:
– 4 ounces cream cheese, softened
– ¼ cup unsalted butter, softened
– 1 cup powdered sugar
– 1 teaspoon vanilla extract

Easy homemade cinnamon rolls, Best cinnamon roll recipe, Quick and easy cinnamon rolls, Classic homemade cinnamon rolls, Step-by-step cinnamon roll recipe, Gooey cinnamon rolls, Fluffy cinnamon rolls,

How to Make these Easy Cinnamon Rolls :

1. Activate the Yeast:
– In a bowl, combine warm milk and a pinch of granulated sugar.
– Sprinkle the yeast on top and let it sit for about 5 minutes until it becomes bubbly and frothy.

2. Mix the Dough:
– To the yeast mixture, add the remaining sugar, melted butter, egg, and a portion of the flour.
– Stir until it forms a soft, sticky dough.
– Gradually add the remaining flour and salt.
– Knead until the dough is smooth and elastic.

3. Let the Dough Rise:
– Place the dough in a bowl, cover it, and let it rise in a warm spot for about an hour.

4. Roll Out the Dough:
– On a floured surface, roll out the dough into a rectangular shape.

5. Prepare the Cinnamon Filling:
– Spread softened butter evenly over the dough.
– Generously sprinkle brown sugar and ground cinnamon over the butter.

6. Roll Up the Dough:
– Roll up the dough tightly, starting from the long side.

7. Slice and Arrange:
– Slice the rolled dough into equal-sized rounds.
– Arrange the rounds in a greased baking dish, leaving space for them to expand.

8. Bake to Golden Brown:
– Preheat the oven to 350°F (175°C).
– Bake the cinnamon rolls for about 20-25 minutes or until they turn golden brown.

9. Frost with Cream Cheese Frosting:
– While the cinnamon rolls are still warm, generously slather them with cream cheese frosting.
– The frosting is a simple blend of cream cheese, butter, powdered sugar, and a dash of vanilla extract.

10. Enjoy:
– Pull apart a cinnamon roll, let the sweet, gooey goodness stretch, and savor that heavenly bite.
– Whether it’s a lazy Sunday morning treat or a delightful breakfast surprise for loved ones, these cinnamon rolls are the epitome of warmth, comfort, and happiness on a plate.

Cinnabon-style cinnamon rolls, Cinnamon swirl rolls recipe, Cinnamon roll baking tips, Cream cheese frosting for rolls, Irresistible cinnamon rolls, Homemade pastry, Warm breakfast pastries, Cinnamon roll dough, Cinnamon roll glaze recipe, Delicious brunch recipes,

Wrap Up and Savor

And there you have it—your very own batch of Easy Cinnamon Rolls! Pull one apart, let the sweet, gooey goodness stretch, and take that first heavenly bite. It’s like a warm hug for your taste buds, and I guarantee it’ll make your day a whole lot brighter.

So, whether you’re treating yourself on a lazy Sunday morning or surprising your loved ones with a delightful breakfast, these cinnamon rolls are the answer. They’re the embodiment of warmth, comfort, and pure happiness on a plate.

I hope you enjoy making and savoring these cinnamon rolls as much as I do. Remember, there’s something incredibly special about homemade treats that bring joy to your heart and a smile to your face. Happy baking, my friends!

Cinnamon roll filling variations, Cinnamon roll twists, Creative cinnamon rolls, Overnight cinnamon rolls, Holiday cinnamon rolls, Vegan cinnamon rolls, Gluten-free cinnamon rolls, Nut-free cinnamon rolls, Low-fat cinnamon rolls, Diabetic-friendly cinnamon rolls, Low-carb cinnamon rolls

FAQs (Frequently Asked Questions) that you might have about a Cinnamon Rolls Recipe:

1. Can I make the dough in advance and refrigerate it overnight?
– Yes, you can prepare the dough ahead of time, refrigerate it overnight, and continue with the recipe the next morning.

2. How do I make the cream cheese frosting even creamier?
– To achieve a creamier frosting, ensure that your cream cheese and butter are at room temperature before mixing.

3. Can I customize these cinnamon rolls with additional ingredients like nuts or raisins?
– Absolutely! You can add chopped nuts, raisins, or even a drizzle of caramel sauce before baking to personalize your cinnamon rolls.

4. How long can I store these cinnamon rolls, and what’s the best way to store them?
– You can store them in an airtight container at room temperature for up to two days or in the refrigerator for a longer shelf life.

 Cream cheese frosting for rolls, Irresistible cinnamon rolls, Homemade pastry, Warm breakfast pastries, Cinnamon roll dough, Cinnamon roll glaze recipe, Delicious brunch recipes, Cinnamon roll filling variations, Cinnamon roll twists, Creative cinnamon rolls, Overnight cinnamon rolls, Holiday cinnamon rolls, Vegan cinnamon rolls, Gluten-free cinnamon rolls, Nut-free cinnamon rolls, Low-fat cinnamon rolls

5. Are these cinnamon rolls freezer-friendly?
– Yes, you can freeze the unbaked rolls and bake them when needed for a quick and fresh treat.

6. Can I enjoy these cinnamon rolls without the cream cheese frosting?
– Certainly, although the cream cheese frosting adds a delightful touch, you can enjoy these cinnamon rolls without it.

7. What’s the best way to reheat cinnamon rolls?
– To enjoy the warm, gooey goodness again, simply microwave them for a few seconds or warm them in the oven at a low temperature.

8. What occasions are these cinnamon rolls perfect for?
– These cinnamon rolls are ideal for breakfast, brunch gatherings, or as a delightful dessert for any occasion.

9. Where can I find the full Easy Cinnamon Rolls Recipe for future reference?
– You can bookmark this page or save the Easy Cinnamon Rolls Recipe for your future baking adventures.

10. Can I make variations of this recipe to suit dietary preferences like vegan or gluten-free?
– Yes, you can adapt the recipe to make vegan or gluten-free cinnamon rolls by using suitable substitutions for dairy or flour.

Easy Cinnamon Rolls, Cinnamon Rolls Recipe, Homemade Cinnamon Rolls, Cinnamon Bun Recipe, Sweet Breakfast Ideas, Baking Cinnamon Rolls,